Now let’s get started with setting up an Application Load Balancer on AWS.
What an Application Load Balancer actually does
A load balancer solves a problem that appears the moment you run more than one server: clients need one stable address, while you need the freedom to add, remove and replace instances behind it. The ALB accepts every request at a single DNS name and decides which healthy target should answer.
The “Application” part matters. An ALB operates at layer 7, so it can read the HTTP request — host, path, headers, method — and route on what it finds. That is what lets one load balancer send /api to one target group and /images to another. A layer-4 load balancer cannot do this, because it never looks inside the connection.
| Type | Layer | Reach for it when |
|---|---|---|
| Application (ALB) | 7 (HTTP/HTTPS) | Web apps, APIs, containers, path or host routing |
| Network (NLB) | 4 (TCP/UDP/TLS) | Extreme throughput, very low latency, static IPs, non-HTTP protocols |
| Gateway (GWLB) | 3 (IP) | Inserting firewalls or inspection appliances into the path |
| Classic (CLB) | 4 and 7 | Legacy only — use ALB or NLB for anything new |
Two constraints to know before you click anything, because both stop the build cold:
- An ALB needs subnets in at least two Availability Zones. This is not a recommendation, it is a hard requirement — the create wizard will not let you continue with one. If your VPC only has subnets in one AZ, create a second one first.
- The ALB is not free. Unlike a peering connection, it bills per hour from the moment it exists, plus a usage charge, whether or not any traffic reaches it. Delete it when the lab is finished.
Pre-requisite
AWS Account : Sign in to the AWS Management Console : Go to https://console.aws.amazon.com and sign in to your AWS account.
Navigate to the EC2 Dashboard
First we are going to launch EC2 instances. Will launch 2 instances.
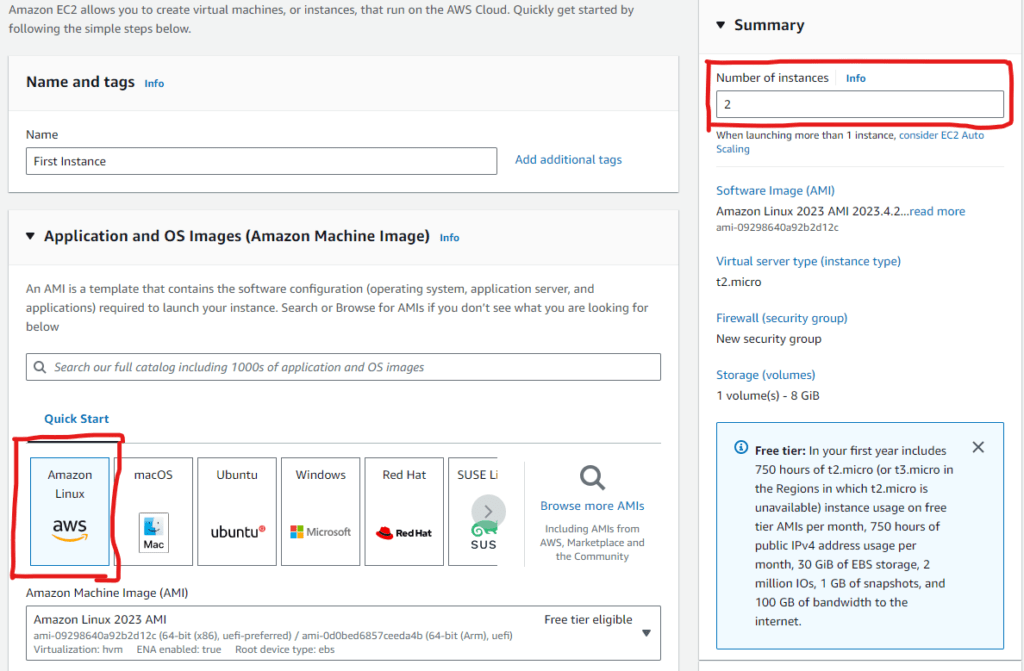
Select Instance type t2.micro
Keypair: We can proceed without a key pair as there is no need to SSH
Network Settings: Allow HTTP and SSH traffic
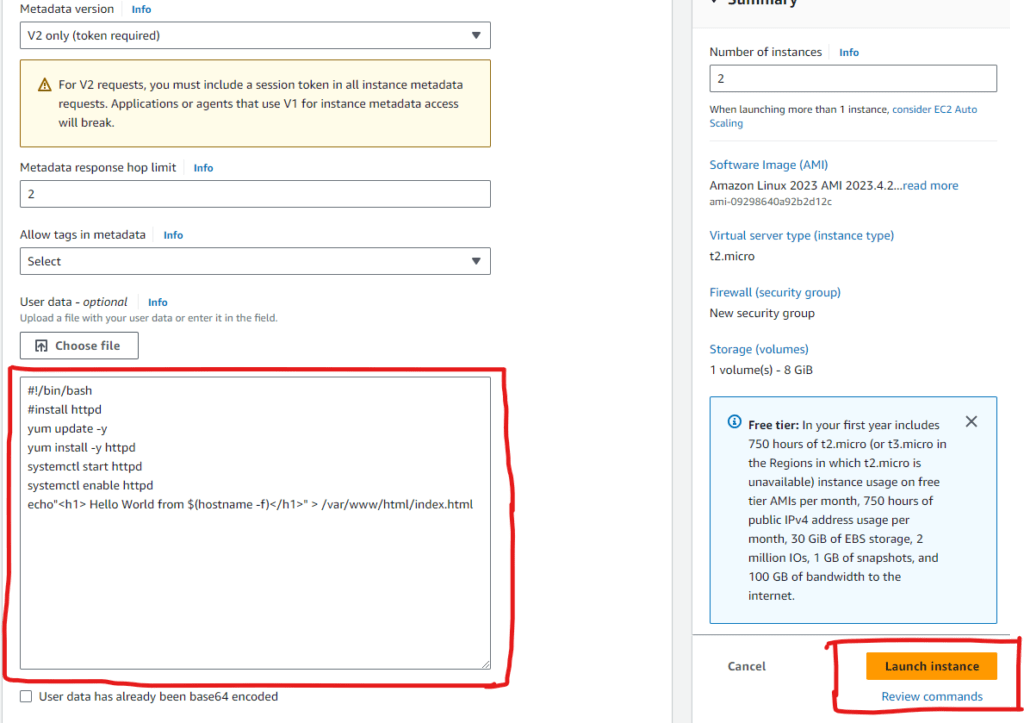
Select Advanced details and scroll down to user data and paste the follow script.
#!/bin/bash
# Use this for your user data (script from top to bottom)
# install httpd (Linux 2 version)
yum update -y
yum install -y httpd
systemctl start httpd
systemctl enable httpd
echo "<h1>Hello World from $(hostname -f)</h1>" > /var/www/html/index.html
Click Launch Intance
Want To Learn Configuring AWS VPC Peering Connection
Update the Instance names of your choice

After EC2 Instances are ready, click on any one of the instances and copy the public Ip addres or public Ipv4 DNS address and paste in browser.

Repeat the same with second instance
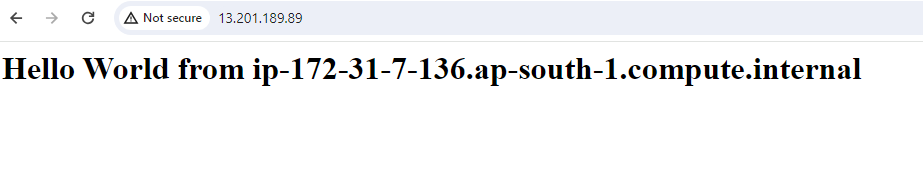
We can see two instances giving us two Hello World and the last part is changing. So now our primary goal is to access one URL and balance the load between two instances. For this we need to set up a Load Balancer
Go to Load Balancers
Click on create load balancer
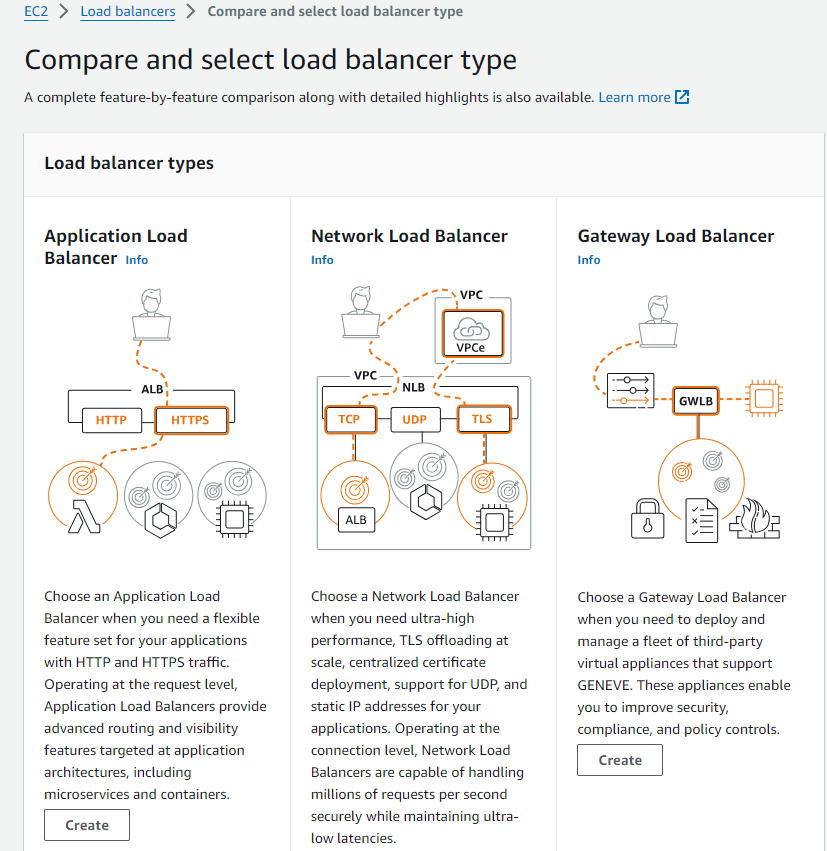
We have different load balancer types and for this hands on we are only looking at Application Load Balancer
Application load balancer is for HTTP and HTTPS traffic
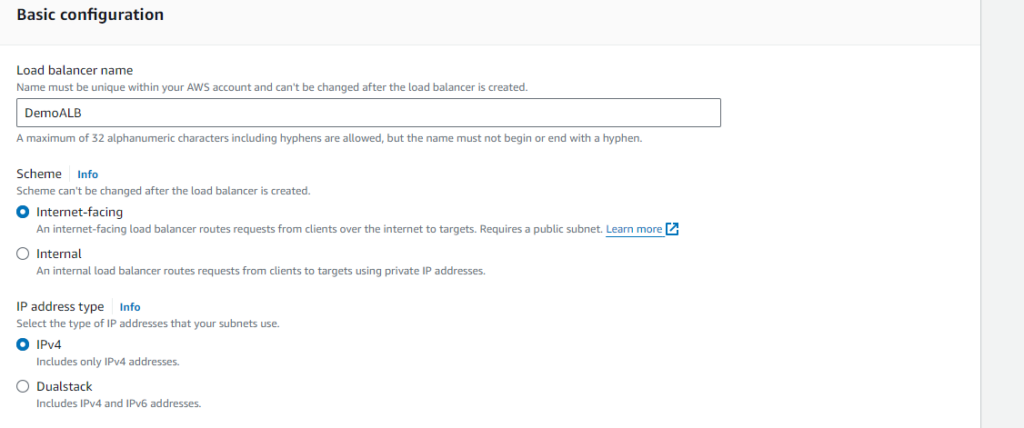
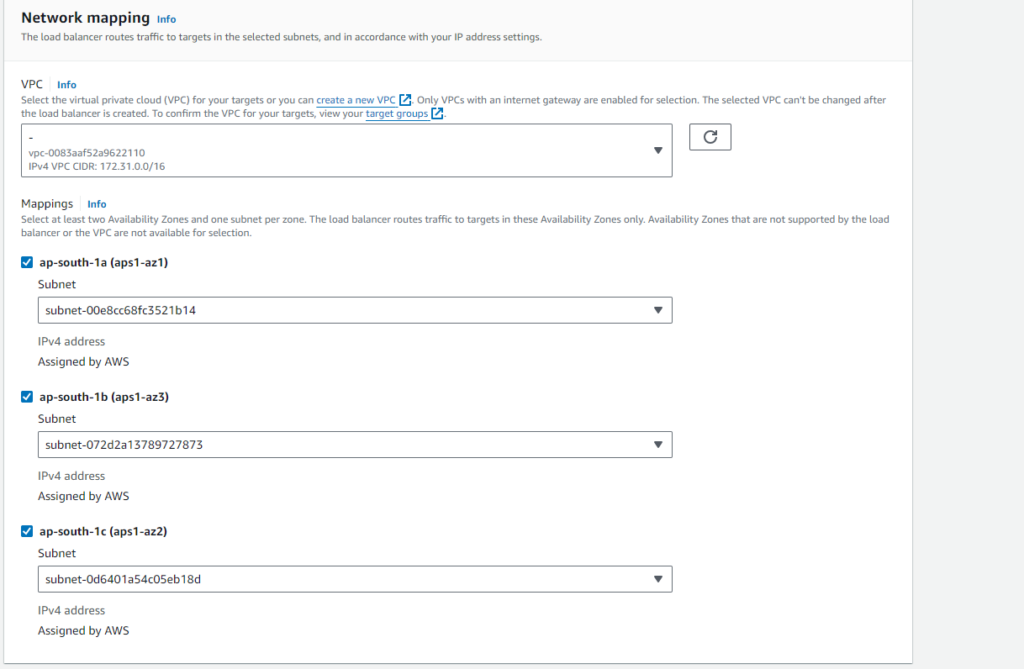
Create a Security Group for ALB with HTTP enabled
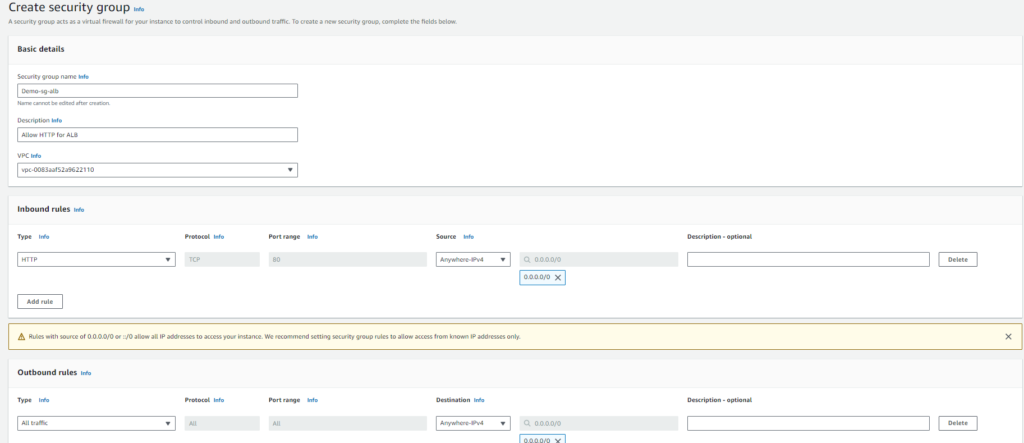
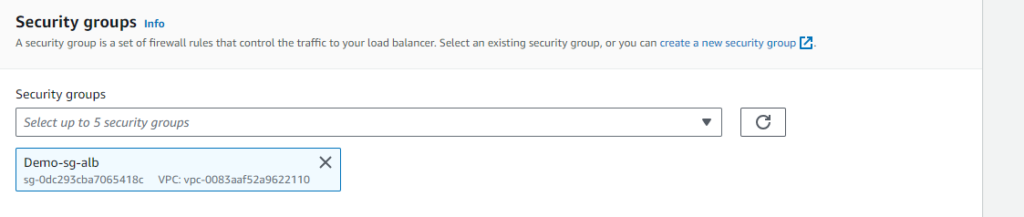
Now we need to route the traffic from HTTP port 80 to Target Group. It is a group of EC2 instances created. Click on Create a Target Group
In Basic Configuration: Select target type Instances
Target group name as your choice
Ip address type Ipv4
Protocol version HTTP1
Registered targets
Next, We will register the EC2 instances (in the case two, but it can be more ) for this target group. This implies that all healthy instances (or web servers) in this target group would receive equal or close to equal loads/web traffic, ensuring higher availability, scalability, and reliability of your application.
select the two instances and click on Include as pending below
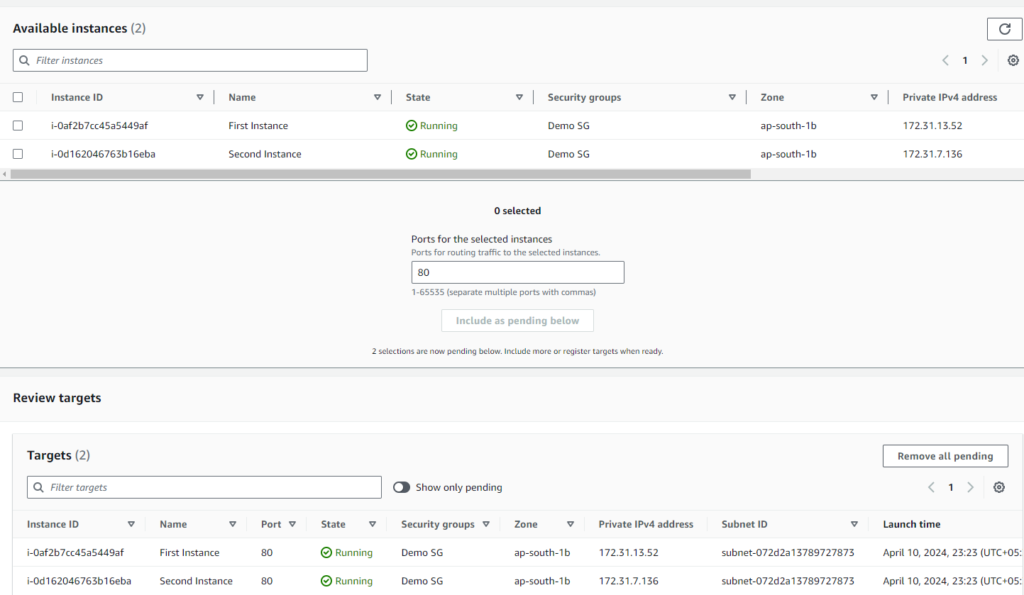
Review and click on Create target group
Attach the target group created to load balancer. Now the load balancer will be in provisioning state.

Wait until state becomes Active.

Copy the DNS name and paste in browser and you can see Hello World through Application load Balancer. If you now refresh the browser and keep on refreshing, you can see the target is changing, it’s because application load balancer redirecting between both the EC2 instances. This is the proof that load balancing is actually happening.


Health checks: the setting that decides everything
The target group has a health check, and it is the most consequential setting in this whole build. The ALB only sends traffic to targets it believes are healthy; if the check is wrong, a perfectly working server gets pulled out of rotation, and if every target fails you get a 503 from the load balancer itself.
The default check requests / and expects HTTP 200. That happens to pass here because our user-data script writes an index.html. On a real application, / is often a redirect to a login page — a 302, not a 200 — and every target is marked unhealthy while the app is running perfectly.
| Setting | Default | What it means in practice |
|---|---|---|
| Path | / | Point it at a cheap endpoint such as /health that returns 200 without touching your database |
| Interval | 30s | How often each target is probed |
| Timeout | 5s | Must be lower than the interval |
| Healthy threshold | 5 | Consecutive passes before traffic returns to a target |
| Unhealthy threshold | 2 | Consecutive failures before it is pulled out |
| Success codes | 200 | Widen to 200-299 only if you genuinely mean it |
Multiply interval by unhealthy threshold to get your real failure-detection time: with the defaults, a dead instance keeps receiving traffic for up to a minute. Tightening to a 10-second interval with a threshold of 2 cuts that to roughly 20 seconds, at the cost of more probe traffic and a greater chance of evicting a target that was merely busy.
Fix the security groups before you call this done
Earlier we allowed HTTP and SSH straight to the instances, which is fine for getting the lab working — it is how you confirmed each server independently. It is also the thing to correct next, because right now every instance is directly reachable from the internet and users can bypass the load balancer entirely.
The pattern you want is security group chaining: the instances accept HTTP only from the load balancer’s security group, not from a CIDR range.
# Allow HTTP into the instances ONLY from the ALB's security group
aws ec2 authorize-security-group-ingress
  --group-id sg-INSTANCES
  --protocol tcp --port 80
  --source-group sg-ALB

# Then remove the open-to-the-world rule
aws ec2 revoke-security-group-ingress
  --group-id sg-INSTANCES
  --protocol tcp --port 80
  --cidr 0.0.0.0/0
Referencing a security group rather than an IP range means it keeps working as instances are replaced and addresses change. In a production layout the instances would also sit in private subnets, with only the ALB in public ones — the private-subnet pattern from the VPC walkthrough is exactly what you would reuse.
Going further: routing rules and HTTPS
Round-robin across two identical servers is the demo, not the point. The ALB earns its keep through listener rules, evaluated in priority order until one matches:
- Path-based —
/api/*to one target group, everything else to another. This is how a monolith gets carved up without changing a single client URL. - Host-based —
admin.example.comandwww.example.comserved by one load balancer. - Weighted target groups — send 95% of traffic to the current version and 5% to the new one. That is a canary deploy with no extra tooling.
For HTTPS, request a free certificate from AWS Certificate Manager, add an HTTPS listener on port 443, and change the port 80 listener from “forward” to “redirect to HTTPS”. TLS terminates at the load balancer, so your instances keep serving plain HTTP on port 80 and need no certificate of their own.
Troubleshooting
| Symptom | Usual cause |
|---|---|
| 503 Service Unavailable | No healthy targets. Check the Targets tab for the reason code before changing anything else. |
| 502 Bad Gateway | A target accepted the connection then returned something malformed, or closed early. Usually the app crashing, not the ALB. |
| Request times out | The instance security group does not allow the ALB in, or the ALB is in private subnets with no internet route. |
| Targets stuck “unhealthy” | Health check path returns a redirect or 404. Curl it from a peer instance to see the real status code. |
| Stuck in “provisioning” | Normal for a few minutes. Beyond that, check you selected at least two Availability Zones. |
| Always hits the same instance | Sticky sessions enabled, browser connection reuse, or one target is unhealthy. Try a fresh browser or curl in a loop. |
What it costs, and cleaning up
An ALB bills two ways: a fixed hourly charge for every hour it exists, plus Load Balancer Capacity Units that measure new connections, active connections, processed bytes and rule evaluations. A quiet lab load balancer costs very little in LCUs and a steady amount in hours — which is precisely why an idle one left running for a month is the classic surprise on an AWS bill. Check the current pricing page for rates in your Region.
To tear the lab down, in this order:
- Delete the load balancer — this stops the hourly charge immediately.
- Delete the target group, which is now unreferenced.
- Terminate both EC2 instances.
- Delete the security groups you created for the ALB and the instances.
Common questions
Why does the ALB have a DNS name instead of an IP address?
Because it scales by adding and removing nodes behind the scenes, and their addresses change. Always point clients and DNS records at the name, never at a resolved IP. If you genuinely need a fixed IP, that is an NLB.
Can one ALB serve several applications?
Yes, and it is often the cheaper design. Use host- or path-based rules pointing at different target groups instead of paying the hourly charge for several load balancers.
Does it balance strictly evenly?
Close to it. The default is round robin per target group; least-outstanding-requests is also available and usually better when request durations vary a lot. Keep-alive and sticky sessions both make the split look less even than it is.
How does this work with Auto Scaling?
Attach the target group to an Auto Scaling group and registration becomes automatic — new instances join as they pass health checks, and terminated ones are drained out. That combination is the standard production pattern; registering instances by hand, as we did here, is a learning exercise.
As usual, I’m interested in hearing your opinions on this article. Do not hesitate to leave a comment!
Pingback: AWS VPC Peering
Pingback: Serverless Computing with AWS Lambda: A Beginner's Guide - wordwyzz